Monday, April 29, 2013

Modge Podge side table… fun and funky!

This weekend the weather was absolutely beautiful, and I couldn't help myself but to be outside. With that being said, I unfortunately did not get to any new crafting projects this weekend. BUT, I thought I would share with you guys a project that I did when I was preparing the nursery for my daughter! Since I wasn't planning to blog about this project at the time, I don't have step-by-step photos, or a photo of the original piece that I purchase, but I will do my best to give you instructions you can follow without the photos!

When I was working on getting my daughter's nursery put together, I knew that I wanted some kind of side table for next to the rocking chair (for bottles, tissues, etc). I decided that I wanted something unique and fun to go along with the color scheme (which was gray and light pink with black accents). During one of what seemed like weekly trips to Michaels, I was strolling down the unfinished wood aisle, and came across this table that had two sides that folded down with a small shelf on the bottom. It was the perfect height and size for a smaller room, so I just HAD to get it. Even though I wasn't exactly sure what I was going to do with it at the time, for around $12, I couldn't pass it up. (the picture below in the "supplies" section it a similar version of the table, but mine was smaller). After a little thinking, I decided it might be fun to try to modge podge the table with scrapbooking paper, since I had seen an entire book of paper in the colors of the nursery. Sooooo… that is where this idea all began!


Here is the finished product:


Supplies:
• Unfinished wood table
• Scrapbook paper in colors of your choosing (cut into 4x4" squares)
• Modge Podge
• Foam brush (small enough size to fit into the Modge Podge container)
• Black gloss spray paint (I used an indoor/outdoor so that I knew it would stand up to things being spilled on it!)
• Acrylic gloss coating spray
• Newspaper, paper bags or cardboard (to use on the table when spray painting)
• Sand paper
• Rubber gloves (optional)


Step One:
Give the table a light sanding. Since this is an unfinished table, you don't really have to sand too much, but I did just to get rid of any rough patches on the wood. 

Take the table to a well ventilated area (such as an open garage or outside), and cover the entire area under the table with newspaper, paper bags or cardboard to keep the spray paint from getting onto the surface under the table. If you would like, use rubber gloves (or gloves of some sort) when spray painting to keep any dripping of the paint off of your hands. Give the table a good coat of spray paint on all sides. (I had to get down into a lot of weird positions to make sure I sprayed all areas of the table!) Let the first coat dry completely. Once dry, give it another coat of spray paint. I only needed 2 coats, but if you feel it needs another coat for complete coverage, go ahead and do so.


Step Two:
Before you start this next step, if you would like, layout all of your 4x4 squares of scrapbook paper to figure out how you would like them organized on your table. I just started with one and put the look together as I went. 

Start in the middle of the table, and apply modge podge to both the table surface and the back of the paper. Lay the paper onto the table and press flat. If you would like to get a nice smooth look, use a credit card (or something similar) to press down all edges of the paper. Then apply another layer of modge podge over the top of the paper. Continue to work outward from your first piece, and repeat these same steps with the modge podge. I saved the edges of the table till the end since those were just a tad trickier.

For the edges, place the paper square where it would need to be (don't modge podge yet), and from the under side, trace the edge of the table onto the overhang of the paper. Remove the paper and trim off the excess that hangs over the table. Now you can repeat the layers of modge podge. Do these same steps with all of the edge pieces. (It might sound more difficult than it actually is – I swear!) 

My table also had a small shelf underneath, so I chose to also modge podge the top of that. It would have looked fine just black, it's just a preference.


Step Three:
When you have completely the entire table top and the modge podge is completely dry, take the table back out into a well ventilated area. Give the table a coat or two of the acrylic gloss coating. This will not only give the table a nice, finished, glossy look, but it will help protect the entire table from spills and stains. Once the spray is dry (which only take about 20 minutes), you are all done!!!!! 

Now you can go show off your fun and funky side table!


Hope you enjoy your new table and Happy Monday!!!!


Monday, April 22, 2013

Weekend project: Frumpy to Funky Cork Initial Artwork

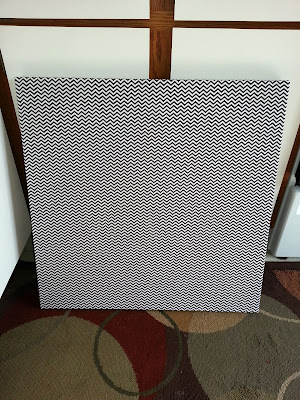
For a while now, I've been trying to think of something to do with this old painting I had hanging above my "coffee station" in my kitchen. Although not terrible, it just wasn't doing anything for me any more. Since it was a painting that had taken me maybe and hour to do, I didn't really feel to bad about covering it up! (This idea could also easily be done with a brand new canvas, an old painting you find at the thrift store, or even a piece of wood! When I was trying to come up with an idea, I knew I wanted something a little different and unique, and something with a little dimension. This is what I came up with:


Besides that black and white chevron fabric, which I purchased on sale at JoAnn Fabrics for $4.99/yard, all the other materials used in this piece were recycled or upcycled. Obviously the canvas was an old painting I had, the frame was from an old picture I bought at the thrift store for $6.99 and I have a large collection of corks laying around the house. (No, I didn't drink ALL of those bottles of wine… just most of them!)

{Left: My old painting • Right: Old picture from thrift store}

There can be many variations of this artwork per your own preferences, so go ahead and tweak for your liking! Here are the supplies you will need:

• Canvas or scrap wood (size of your choice)
• 1 yard of fabric
• Wood frame (with glass, picture and backing removed)
• Sand paper
• Wine corks (Number of corks will vary depending on the letter you are making)
• Hot glue gun
• Staple gun 
• Black and Teal acrylic paint – or colors of your choosing (I also used white paint to cover up the old painting – optional)
• Acrylic Gloss coating spray (optional)

Now lets get started!!


Step One:

To start, I took the old wood frame and gave it a light sanding. You don't have to sand too much, just enough to get most of the shiny finish off of the frame. Next, give the frame two coats of acrylic paint. (you may need 3 depending on the thickness of your paint.) Once the paint is completely dry and you are happy with the covering of the paint, take the frame to a well-ventilated area and spray it with the gloss coating spray. (This part is optional, but I did it to give the frame a glossy finish, versus a more flat finish). This spray only takes about 20 minutes to dry completely. 


Step Two (optional):

Give the old painting a coat or two of white paint, in order to make sure that none of the old painting shows through the fabric placed over it. 


Step Three:

Iron your fabric to make sure that there are no fold lines visible. Then, place your canvas face down onto the fabric, and, starting on one side, pull the fabric nice and tight around the edge (starting in the middle of the edge) and staple the fabric to the wood frame of the canvas. Do this all along that edge, stapling about every 4 inches or so. Then, move on to the opposite side of the canvas and do the same thing, making sure to pull the fabric nice and tight. Once you have the fabric stapled along all four sides of the canvas, trim off any extra fabric, just so that it doesn't get in the way when you are hanging the artwork.


Step Four:

Lay your frame on the front of the canvas and determine the placement you would like. One you have figured out exactly where you would like the frame to sit, trace along the inside of the frame with a pencil so you have an idea of where to paint the black that will show behind the frame. 

Take the black paint (or whatever color you choose) and paint inside the area that you just traced with the pencil. You will then actually paint a little outside the lines (I know, you were always taught to paint INSIDE the lines – but we are being rebels!) This will assure that you will not see any of the line once you attached the frame. 


Step Five:

Once the paint in dry, we will attached the frame to the canvas. I did this as a two step process. First I used hot glue to get the frame on the canvas. The hot glue may have been enough to hold the frame since it was not very heavy, but I didn't want to take the chance of the frame falling off. So after the hot glue is dry, carefully flip the canvas with frame attached over so it is face down. Carefully use the staple gun (or small nails if you prefer) and staple into the frame from the back of the canvas. Staple along all edges of the frame. This will just give the frame a stronger hold to the canvas.

Detail showing the stapling on back of canvas


Step Six:

You're almost done! Now it is time to create your cork letter. I spent a few minutes trying different ways to create my "K" with the corks. I played around with the corks on the artwork directly, so once I had them exactly how I wanted to them, I didn't have to try to move them or recreate it on the canvas. One by one I removed the corks and hot glued them back into place. Once all of the corks had been glued down, I went back and put hot glue in between all the corks as well to make sure they all stayed together nicely. 

In this detail you can see the hot glue in between the corks

AND… you're done! 


Now go hang it up and BE PROUD of your new Frumpy to Funky creation!


Happy Earth Day!


Friday, April 19, 2013

Personalized Chevron Silhouette Painting

I had been looking to create some kind of personalized artwork around my beloved pup, and this was actually an idea I can up with on my drive in to work. (Believe me, an hour each way gives you a lot of time to think!) This project could easily be personalized around you pets, family members or really any shape that trips your trigger, or goes with your overall decor (trees, birds, etc).

Overall, this project only costs me around $12.00! Not bad for 2 paintings!


Here is the final product, and similar to what you would be working towards:


List of supplies needed:

• 2 same size canvases (mine were 12x12 – which I got on sale at Michaels for $5 for the pair)
• Acrylic paints (in colors of your choice – I used gray, lime green, aqua and black – which I also got on sale at Michaels, 4 for $2)
• Roll of 1" Masking Tape
• Wooden letters (Bought mine at Michaels for $1.50 each)
• Silhouette printouts (trimmed)
• Hot glue gun (with glue stick)
• Colored scrapbook paper (OPTIONAL – for the front of the letters)
• Gloss acrylic coating spray (OPTIONAL – I used the finish spray because the paints I used had a matte finish, and I really wanted a more glossy/shiny finish)   


Step One:

Find the images you would like to use as the silhouettes on the paintings. I chose to use images of my pups. To create the images, I found photos of my dogs that had decent profiles, opened them in photoshop and then used the paint brush tool (in black) to paint over the area of the photo that I wanted to use. Once I had the black image, I printed them out on regular 8.5x11 copy paper. 

Other options for this step would be to just print out the image you want (enlarged to fit on an 8.5x11). Use tracing paper to trace the part of the image you would like to see as your silhouette. Then cut out the image (which you will use as a stencil for your painting). 

If you wanted to use a general image, such as a tree or animal, you can find a wide variety of silhouette images by using Google. 


Step Two:

Choose the color you would like to use as the background color (or lighter base color). In my painting I chose the light gray. Paint the entire canvas, including the edges. (this will give it a more finished look when you are done) If you would like a greater contrast in your chevron pattern, you can just leave the background white and skip this step.


Step Three:

While the paint is drying on the canvases, I would get started on your letters (if you choose to use them). First, decide on what paper (or paint color) you would like on the front of your letters. I decided on a shimmery silver paper. If you choose to use paper, place the letter upside down on the paper and trace it. You want to make sure you trace nice and close to the letter so it fits nicely on the front. Then trim out the letters. 

Next, decide what color you want to show on the sides of your letters. I chose black since it would match with the black silhouette. Paint all sides of the letter. Once the paint has completely dried (acrylic paint dries quite quickly), use a glue of your choice to glue the paper to the front of your letter. (I used a basic crafting glue).


Step Four:

Once you are done with your letters, the base color on your canvases should be dry. Now is time to create your chevron pattern. You can do this multiple ways, but I'm a perfectionist, so I chose to use a right triangle ruler to sketch out my pattern. The ruler makes it easy to get perfect lines and perfect angles. Once your pattern is sketched out, take your masking tape and tape along your sketched lines. I cut the ends of the tape in order to get perfect lines at the points.  If you have a good eye, you can also just take out the pattern without sketching first if you prefer.

Now that your pattern is all taped, go ahead and take your second color and paint over the entire top side of your canvas. Let this layer dry completely and then remove the tape. (This is my favorite part because I love seeing the finished pattern!) Since you sometimes will get a little bleed through where your tape was, you can take a small paint brush and touch up any spot where the paint bled through onto your first color.


Step Five: 

Trace your silhouette image onto your canvas. You can place it wherever you would like, but I like things to be a little off center, so I chose to place the images on opposite edges of the canvases. Use the black paint (or whatever color you would like the silhouettes) and paint the silhouette. If you have thick enough paint, you should only need one coat to cover the other colors (especially if you are using black).


Step Six:

This step is optional, depending on your preference on the finish of your paintings. Take your paintings to a well ventilated area, and spray the gloss finish spray to cover your entire canvases. This usually only take about 10 minutes to dry, but I usually give it about 30 minutes just to be safe.


Step Seven:

Now, onto the very last step in creating your masterpiece. Take your painted letters, and figure out where you would like to place them on your paintings. Once you have decided, use a hot glue gun to completely cover the back of the letter and place it onto your canvas. I placed my hand on the back of the canvas when I was pushing down on my letter to make sure it was on nice and tight.


Now, step back and enjoy all your hard work!


Nershi posing with the the masterpiece!

If you have any questions about my process or any of my supplies, 
feel free to message me. I would love to hear your feedback!


New to the Craftin' Blog World!

Howdy all! Thanks for visiting my new crafting blog! I have dabbled in the blogging world a little with my Blog featuring my darling daughter Sommer (sommersausage.com), but brand spanking new to the craft blogging world. I've always loved art and crafting (as I am a graphic designer by profession), but never really thought too much about sharing these fun crafts with all of you! Thanks to my good friend Cassie (who has an awesome blog http://thepenny-wisemommy.blogspot.com/ ) I have decided to give this a whirl! 

Since I am a mom of a young one (and two furry children, who you will see reference to in my first craft post) I am on a tight budget, with little time to really spend on myself and crafting. BUT, we can all make it work. I hope to bring you all fun and exciting crafting ideas that not only fit into you budget, but your busy schedule as well! 


Enjoy and I hope you come back to see what I have in store!! 

TGIF :)