
Overall, this project only costs me around $12.00! Not bad for 2 paintings!
Here is the final product, and similar to what you would be working towards:

List of supplies needed:
• 2 same size canvases (mine were 12x12 – which I got on sale at Michaels for $5 for the pair)
• Acrylic paints (in colors of your choice – I used gray, lime green, aqua and black – which I also got on sale at Michaels, 4 for $2)
• Roll of 1" Masking Tape
• Wooden letters (Bought mine at Michaels for $1.50 each)
• Silhouette printouts (trimmed)
• Hot glue gun (with glue stick)
• Colored scrapbook paper (OPTIONAL – for the front of the letters)
• Gloss acrylic coating spray (OPTIONAL – I used the finish spray because the paints I used had a matte finish, and I really wanted a more glossy/shiny finish)

Step One:
Find the images you would like to use as the silhouettes on the paintings. I chose to use images of my pups. To create the images, I found photos of my dogs that had decent profiles, opened them in photoshop and then used the paint brush tool (in black) to paint over the area of the photo that I wanted to use. Once I had the black image, I printed them out on regular 8.5x11 copy paper.
Other options for this step would be to just print out the image you want (enlarged to fit on an 8.5x11). Use tracing paper to trace the part of the image you would like to see as your silhouette. Then cut out the image (which you will use as a stencil for your painting).
If you wanted to use a general image, such as a tree or animal, you can find a wide variety of silhouette images by using Google.

Step Two:
Choose the color you would like to use as the background color (or lighter base color). In my painting I chose the light gray. Paint the entire canvas, including the edges. (this will give it a more finished look when you are done) If you would like a greater contrast in your chevron pattern, you can just leave the background white and skip this step.

Step Three:
While the paint is drying on the canvases, I would get started on your letters (if you choose to use them). First, decide on what paper (or paint color) you would like on the front of your letters. I decided on a shimmery silver paper. If you choose to use paper, place the letter upside down on the paper and trace it. You want to make sure you trace nice and close to the letter so it fits nicely on the front. Then trim out the letters.
Next, decide what color you want to show on the sides of your letters. I chose black since it would match with the black silhouette. Paint all sides of the letter. Once the paint has completely dried (acrylic paint dries quite quickly), use a glue of your choice to glue the paper to the front of your letter. (I used a basic crafting glue).

Step Four:
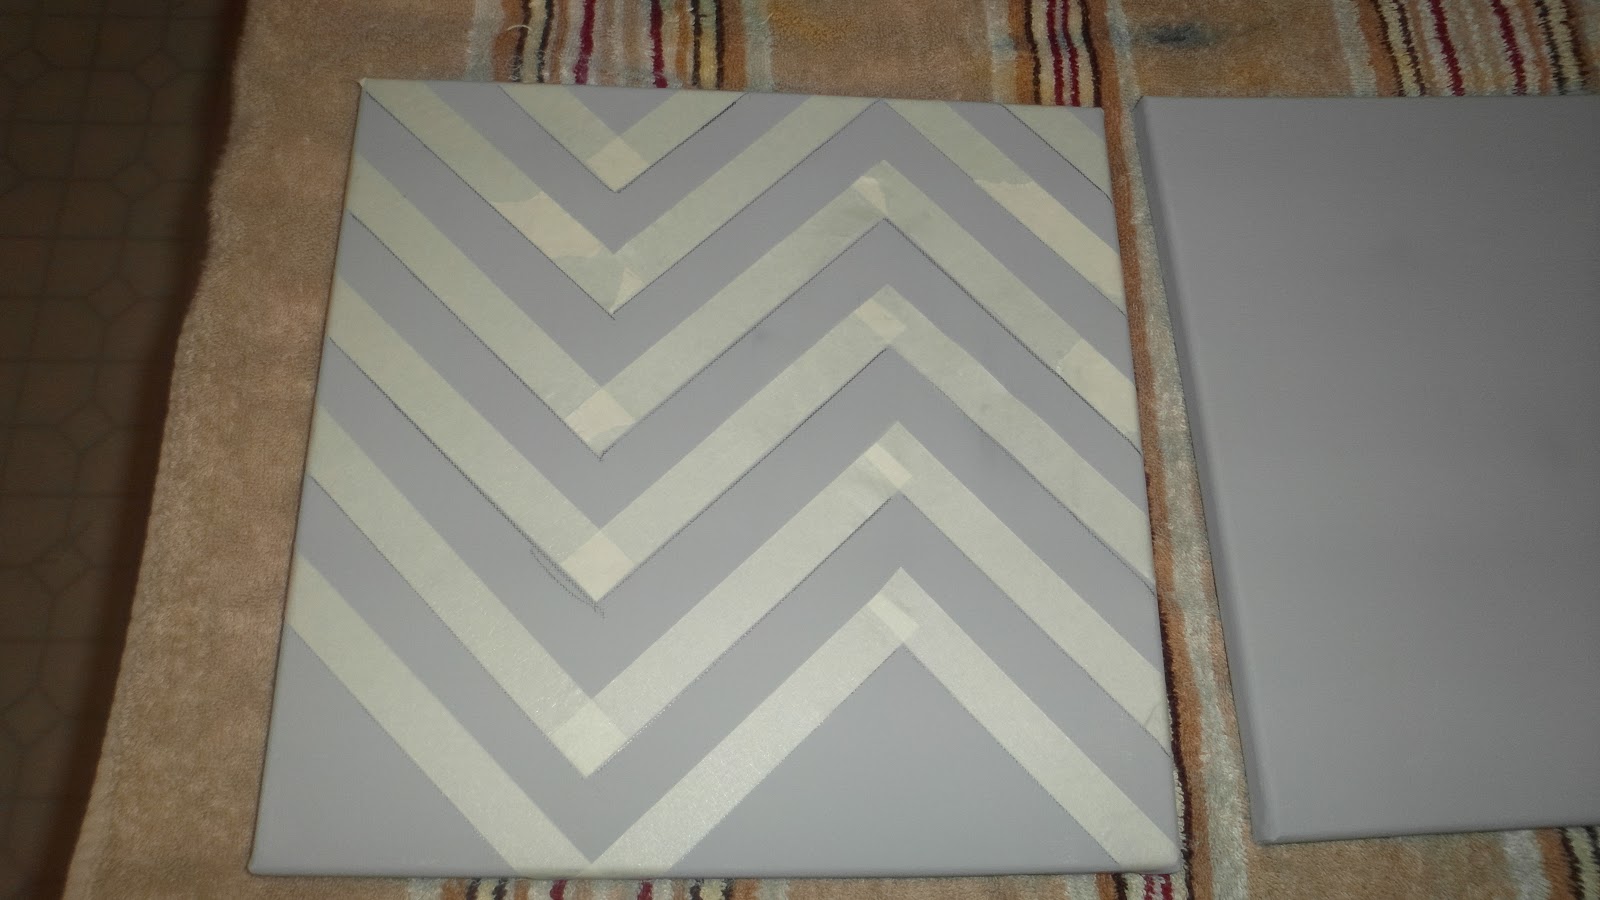
Once you are done with your letters, the base color on your canvases should be dry. Now is time to create your chevron pattern. You can do this multiple ways, but I'm a perfectionist, so I chose to use a right triangle ruler to sketch out my pattern. The ruler makes it easy to get perfect lines and perfect angles. Once your pattern is sketched out, take your masking tape and tape along your sketched lines. I cut the ends of the tape in order to get perfect lines at the points. If you have a good eye, you can also just take out the pattern without sketching first if you prefer.
Now that your pattern is all taped, go ahead and take your second color and paint over the entire top side of your canvas. Let this layer dry completely and then remove the tape. (This is my favorite part because I love seeing the finished pattern!) Since you sometimes will get a little bleed through where your tape was, you can take a small paint brush and touch up any spot where the paint bled through onto your first color.


Step Five:
Trace your silhouette image onto your canvas. You can place it wherever you would like, but I like things to be a little off center, so I chose to place the images on opposite edges of the canvases. Use the black paint (or whatever color you would like the silhouettes) and paint the silhouette. If you have thick enough paint, you should only need one coat to cover the other colors (especially if you are using black).

Step Six:
This step is optional, depending on your preference on the finish of your paintings. Take your paintings to a well ventilated area, and spray the gloss finish spray to cover your entire canvases. This usually only take about 10 minutes to dry, but I usually give it about 30 minutes just to be safe.
Step Seven:
Now, onto the very last step in creating your masterpiece. Take your painted letters, and figure out where you would like to place them on your paintings. Once you have decided, use a hot glue gun to completely cover the back of the letter and place it onto your canvas. I placed my hand on the back of the canvas when I was pushing down on my letter to make sure it was on nice and tight.
Now, step back and enjoy all your hard work!

 |
| Nershi posing with the the masterpiece! |


If you have any questions about my process or any of my supplies,
feel free to message me. I would love to hear your feedback!
No comments:
Post a Comment
Let me know what you think of my craftin'!